This guide explains how to install and set up a smart thermostat in a dorm room. It covers the necessary tools, steps for installation, and configuration to ensure optimal comfort and energy efficiency. Suitable for beginners, this process takes approximately 30 to 45 minutes.

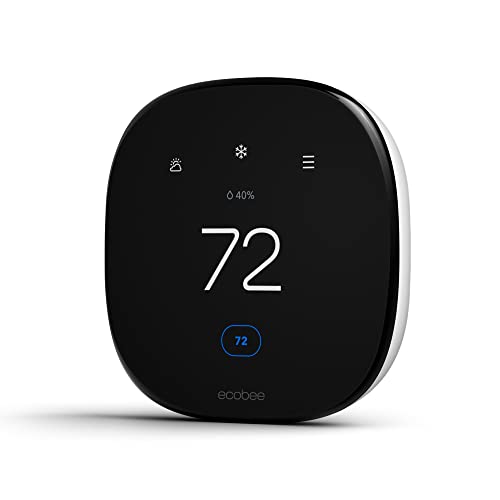
ecobee Smart Thermostat Essential – Energy Star Certified Wi-Fi Programmable Thermostat
- ✔ Energy Star Certified: Yes
- ✔ Compatibility: Most 24 VAC HVAC systems, including gas, oil, electric, dual fuel, and heat pump
- ✔ Control: Color touchscreen, ecobee app

ecobee Smart Thermostat Enhanced – Programmable Wi-Fi Thermostat with Voice Assistant Compatibility
- ✔ Energy Star Certified: Yes
- ✔ Compatibility: Most 24 VAC HVAC systems including gas, oil, electric, dual fuel, heat pump, and boilers
- ✔ Power Source: Hardwired with Power Extender Kit included

Sensi Smart Thermostat, Wi-Fi, DIY, Alexa, Energy Star Certified, ST55
- ✔ Controller Type: Amazon Alexa, Apple HomeKit, Google Assistant, SmartThings, Vera
- ✔ Additional Features: Data Privacy, Easy DIY Install, Energy Savings, Filter Indicator, Programmable
- ✔ Specific Uses: Air Conditioner, Boiler, Furnace, Heat Pump
Difficulty: Beginner | Time: 30-45 minutes
What You’ll Need
Tools & Materials:
- Screwdriver (Phillips and flat-head)
- Wire strippers
- Drill (if mounting requires)
- Level (optional for alignment)
Knowledge:
- Basic understanding of electrical wiring
- Familiarity with thermostat wiring and HVAC systems
Check your dorm’s wiring compatibility before purchasing a smart thermostat. Confirm that your heating/cooling system is compatible with the device.

ecobee Smart Thermostat Essential - Energy Star Certified programmable Wi-Fi Thermostat - Works with Siri, Alexa, and Google Assistant
Save up to 23% every year on heating and cooling costs, adjusts to your set schedule to save...
As an affiliate, we earn on qualifying purchases.
ecobee Smart Thermostat Essential – Energy Star Certified Wi-Fi Programmable Thermostat
The ecobee Smart Thermostat Essential stands out for its effortless DIY installation, even in dorm rooms without a C-wire, thanks to its Power Extender Kit. It helps save up to 23% annually on energy costs, making it a practical choice for budget-conscious students. Its color touchscreen and compatibility with Siri, Alexa, and Google Assistant add convenience, while optional smart sensors allow room-specific temperature control. However, the SmartSensor is sold separately, and system compatibility checks are recommended before purchase. Compared with the more feature-rich ecobee Enhanced, this model is simpler but still offers significant energy savings with less setup complexity.
Pros:
- Saves up to 23% on energy costs annually
- DIY installation with no C-wire needed
- Compatible with major voice assistants
- Supports smart sensors for room-specific control
Cons:
- SmartSensor sold separately
- Requires compatibility check for HVAC systems
- Some features need extra accessories
Best for: Students who want an easy-to-install, budget-friendly thermostat with good smart home integration.
Not ideal for: Those seeking advanced learning features or built-in sensors without additional accessories.
Bottom line: A straightforward, budget-friendly choice that balances ease of installation with solid energy savings and smart compatibility.
“A straightforward, budget-friendly choice that balances ease of installation with solid energy savings and smart compatibility.”
ecobee Smart Thermostat Enhanced - Programmable Wifi Thermostat - Works with Siri, Alexa, Google Assistant - Energy Star Certified - Smart Home
Save up to 26% per year on heating and cooling costs Automatically adjusts the temperature when you’re away...
As an affiliate, we earn on qualifying purchases.
ecobee Smart Thermostat Enhanced – Programmable Wi-Fi Thermostat with Voice Assistant Compatibility
The ecobee Smart Thermostat Enhanced makes a compelling case for students who want more intelligent control. It can help save up to 26% annually by learning your schedule and adjusting temperatures accordingly. Its hardwired setup with the included Power Extender Kit ensures reliable operation, and remote control via smartphone, tablet, or Apple Watch offers ultimate convenience. This model learns from user habits, optimizing comfort and efficiency over time. The main tradeoff is that it may require more complex initial setup, and system compatibility should be verified before purchase. Compared to the Essential, it offers superior energy savings and smarter features, but at a slightly higher price and setup complexity.
Pros:
- Saves up to 26% on energy costs annually
- Learns preferences for optimal comfort
- Remote control via app and voice assistants
- Includes Power Extender Kit and Trim Kit
Cons:
- Requires system compatibility verification
- Setup can be complex for some users
- More expensive than basic models
Best for: Tech-savvy students seeking maximum energy efficiency and remote control features.
Not ideal for: Students with simpler HVAC systems or those uncomfortable with more detailed setup processes.
Bottom line: Ideal for students wanting a smart, learning thermostat that maximizes energy savings with remote access, though it demands a bit more initial effort.
“Ideal for students wanting a smart, learning thermostat that maximizes energy savings with remote access, though it demands a bit more initial effort.”

Sensi Smart Thermostat, Wi-Fi, DIY, Alexa, Energy Star Certified, ST55
PRIVACY PROTECTION*: Sensi won’t sell your personal information to third parties
As an affiliate, we earn on qualifying purchases.
Sensi Smart Thermostat, Wi-Fi, DIY, Alexa, Energy Star Certified, ST55
The Sensi Smart Thermostat offers a solid balance of affordability and functionality. Its straightforward DIY installation and compatibility with Alexa, Google Assistant, and Apple HomeKit make it accessible for most students. While it provides energy savings of around 23%, it may need a common wire (c-wire) in some setups, which could complicate installation for certain dorm wiring configurations. The design is more traditional, with physical buttons, which may appeal to those preferring simplicity. However, it lacks some of the advanced learning features of the ecobee models, making it less suitable for users wanting highly customizable automation.
Pros:
- Easy DIY installation with step-by-step app instructions
- Supports multiple smart home platforms
- Energy savings of about 23%
- Affordable price point
Cons:
- May require a c-wire in some cases
- Limited advanced feature set
- Basic design may not appeal to all
Best for: Students seeking a cost-effective, easy-to-install smart thermostat with good smart home support.
Not ideal for: Those wanting sophisticated adaptive learning or detailed customization features.
Bottom line: A great value pick for students who want basic smart control and energy savings without complex setup or high cost.
“A great value pick for students who want basic smart control and energy savings without complex setup or high cost.”
As an Amazon Associate we earn from qualifying purchases.
Before You Start
Locate the existing thermostat and turn off power to the HVAC system at the breaker. Read the smart thermostat’s installation manual for specific wiring instructions and compatibility notes. Ensure the room temperature is stable before installation.
Step-by-Step Instructions
Step 1: Turn off power to the HVAC system
Locate the circuit breaker panel and switch off the breaker controlling the HVAC system. Confirm power is off by checking the existing thermostat or using a voltage tester.
Tip: Use a voltage tester to verify there’s no live current before handling wires.
Check: The thermostat and HVAC system are unpowered; no lights or displays are active.
Step 2: Remove the existing thermostat
Unscrew the cover plate of the old thermostat. Carefully disconnect the wires, noting which wire connects to each terminal. Use masking tape to label wires if needed.
Tip: Take a photo of the wiring for reference during installation.
Check: Old thermostat is fully removed, wires are labeled and accessible.
Step 3: Prepare the mounting location
Ensure the wall surface is flat and clean. Use a level to mark the mounting holes aligned with the thermostat’s backplate. Drill holes if necessary and insert wall anchors.
Tip: Choose a location away from direct sunlight, drafts, or sources of heat to ensure accurate temperature readings.
Check: Mounting surface is level, and mounting holes are ready.
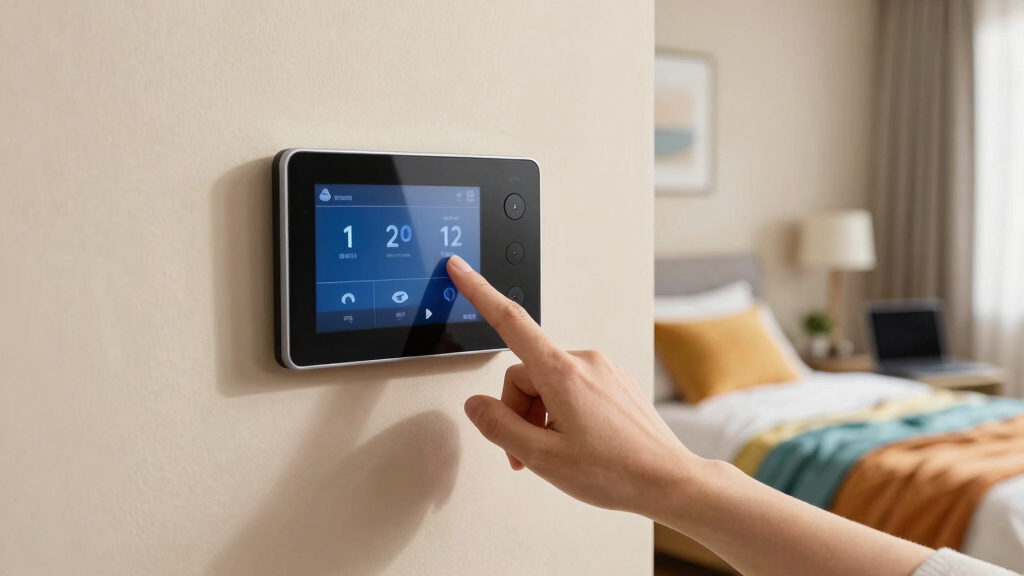
Step 4: Connect the wiring to the new smart thermostat
Attach the labeled wires to the corresponding terminals on the smart thermostat, following the device’s wiring diagram. Tighten terminal screws securely.
Tip: Double-check wire connections against the labels and manual before proceeding.
Check: Wires are firmly connected, with no loose or frayed ends.
Step 5: Mount the smart thermostat
Align the thermostat’s backplate with the mounting holes. Secure it with screws, ensuring it is flush and firmly attached.
Tip: Use a level to verify straight alignment if precision is desired.
Check: Thermostat is securely mounted, with no gaps or tilting.
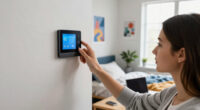
Step 6: Restore power and configure the device
Turn the breaker back on to restore power. Follow the manufacturer’s instructions to power on the thermostat and connect it to Wi-Fi. Complete setup steps such as creating an account and linking to your smartphone app.
Tip: Ensure your Wi-Fi network is active and within range of the thermostat.
Check: Thermostat powers on, connects to Wi-Fi, and displays the home screen or setup menu.
Step 7: Configure temperature settings and schedules
Use the device interface or app to set desired temperature ranges, schedules, and preferences. Save your settings.
Tip: Set different schedules for weekdays and weekends if available, to maximize comfort and energy savings.
Check: Thermostat reflects your settings and responds to remote adjustments.
Common Mistakes to Avoid
- Connecting wires to incorrect terminals — Label wires before disconnecting and verify wiring against the thermostat’s manual.
- Using incompatible thermostat for your HVAC system — Check compatibility with your system type (electric, gas, heat pump) before purchase.
- Not turning off power before wiring — Always switch off the breaker before handling wires to prevent electrical shock or damage.
- Mounting the thermostat in a poor location — Choose a central, draft-free spot away from direct sunlight or heat sources for accurate readings.
Troubleshooting
Problem: Thermostat cannot connect to Wi-Fi
Solution: Ensure Wi-Fi is active, within range, and password is correct. Restart the thermostat and router if needed.
Problem: HVAC system not responding after setup
Solution: Verify wiring connections, ensure power is restored, and check the thermostat’s configuration settings.
Problem: Thermostat displays error message or is unresponsive
Solution: Reset the device according to the manufacturer’s instructions. Reconfigure network settings if necessary.
What Success Looks Like
The smart thermostat is mounted securely, powered on, connected to Wi-Fi, and responds to remote adjustments. It displays the correct temperature, and scheduling functions work as intended.
Next Steps
Regularly check and update device firmware, adjust temperature schedules as needed, and monitor energy usage. If issues arise, consult the manufacturer’s support resources or replace the device if persistent problems occur.
Frequently Asked Questions
Can I install a smart thermostat in a dorm room with limited wiring?
Many smart thermostats are designed for simple wiring and can often be installed with minimal modifications. Check your system’s wiring compatibility before purchase.
Will installing a smart thermostat affect my dorm’s heating or cooling system?
As long as the device is compatible and properly installed, it will control your HVAC system without causing issues. Confirm system compatibility beforehand.
Do I need professional help to install a smart thermostat?
Typically, no. If you are comfortable with basic electrical wiring and follow instructions carefully, you can install it yourself. Seek professional assistance if unsure about wiring or system compatibility.